


Wire Installation
Mounting vs. Burying The Wire
How you decide to bury or mount the wire is entirely up to you and your planned layout. You can even do a combination of both – burying most of it but using a conveniently placed fence to mount the wire that runs along the fence line. Whether you bury or mount your wire depends in large part on the area you are fencing. For a regularly mowed lawn it is best to bury the wire. For areas where you do not mow, or where digging would be impossible, you can simply lay the wire above ground and use lawn staples to hold it in place. The dog fence wire can also be mounted on convenient trees or existing fencing. In many situations professional dog fence installers and homeowners alike chose not to bury the dog fence wire, but rather use dog fence ground staples to secure the wire tightly to the ground. Eventually the grass grows around the wire and hides it for better aesthetic value.
Whether you choose to mount or bury the wire is in large part dependent on the terrain where you plan to install your electric dog fence. There are many reasons to bury the wire and just as many reasons to mount the wire.
Machine Method:
A trencher will dig an appropriate trench, lay the wire inside, and bury the wire all in one fell swoop. This is the tool of choice for professional installers for good reason – it cuts installation time in half. You can lay about 3 yards of wire per minute with the help of this handy tool so it’s well worth the cost of renting one if you want to get the job done quickly and cleanly. *Note that you may need to use an edger or shovel for smaller or sensitive sections where you cannot run the trencher. You can rent a trencher from just about any tool rental store.
Tool check list:
- Wire Trencher Machine
- Stake – a shovel works fine too (for holding the end of the wire in place as the machine pulls wire off the spool)
- Common Wire Stripper (keep these with you in case you need to snip the wire as you cross impasses.)
- Safety Glasses
- Ear Protection
How much time should you budget for installation using a wire trencher?
¼ acre: 1.5 -2.5hours
½ acre: 2-2.5 hours
¾ acre: 2-3 hours
How To Install The Wire Using A Wire Trenching Machine:
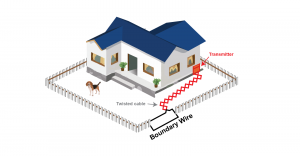
1. Set your trenching machine up at the end of the section of neutral or twisted dog fence wire that runs out from the transmitter box.
2. Familiarize yourself with the wire trenching machine. It’s always a good idea to get a quick lesson from the rental center on general operating procedure.
3. Attach the dog fence wire spool to the trenching machine.
4. Feed the end of the dog fence wire through the wire guide area and down through the hole in the trenching blade on the bottom rear of the machine.
5. Secure the end of the wire to a post or stake in the ground at the point where the boundary wire and twisted wire meet. A shovel or garden trough will do the trick. Leave plenty of room between the stake and the machine to ease starting.
6. Start the wire trenching machine, pushing along your perimeter line to lay the wire.
7. Stop at driveways, pathway and sidewalks to cut or hand lay wire, move the trencher to the other side and repeat the above steps to continue.
8. Continue along the perimeter you planned until you meet back up with the twisted dog fence wire running to your transmitter box.
Pro Tip: When crossing driveways release the cutting blade of your trenching machine, secure the wire on both sides of the crossing leaving at least 12 inches of slack on both ends. This will make your job installing the dog fence cable through the driveway or pathway much easier later on.
FAQ:
Q. Can I cross driveways with the dog fence trenching machine?
A. No. The dog fence trenching machine is designed specifically for burying dog fence wire in grassy areas and cannot be used to cross asphalt, concrete, pavers, or any other permanent pathways. Refer to Crossing Driveways & Sidewalks for more information on methods for laying wire across pathways.
Q. How deep should the electric dog fence wire be buried?
A. The dog fence wire doesn’t actually even have to be buried and will function as well or better without burial. The main reasons for burying dog fence wire are aesthetics, protection, and trip hazard. If you are planning on burying the wire we recommend a depth between 3″ and 24″ – burying the wire too deep may begin to alter the signal strength and risks running into other buried lines on utilities in your yard.
Q. How do I deal with tree roots?
A. Some trenching machines can cut right through thin tree roots and you can continue burying the dog fence wire without slowing down. In most cases, though, you will have to stop your machine release some slack, walk the machine across the tree root and proceed with the installation. Later, you can come back to the root and either cut through it with an axe or chainsaw or if it’s not in a well used area you may be able to simply use garden staples to secure the dog fence wire to the ground on either side of the root.
Q. Can we install some dog fence wire above ground and bury the rest?
A. Absolutely! Depending on the nature of your property you may be able to install wire above ground in areas that are not prone to foot traffic while burying the wire in places where people are more likely to walk or grass will be mowed. We recommend this type of installation as you get the best of both worlds – saving the time and labor of burying where it isn’t really necessary. The general operation of the signal field will not be affected by a mixture of above and below ground installations.
Q. What is the best wire for burying?
A. We highly recommend underground polyethylene coated wire – the type you’ll see the pros using. Although it costs a little bit more initially, it will save you the headache of locating and repairing broken wire over the life of your electric dog fence. If you are using a trenching machine it is also much less likely to break while installing than the cheap 20-gauge wire that comes in the kit. Your dog fence wire is by far the most important component of your electric dog fence and most likely component to break or corrode. Using the same quality material that professional companies like Invisible Fence® will ensure a maintenance free system for years. Heavy duty fence wire is available in our store.
Q. Can I run the dog fence cable through a culvert or drainage ditch?
A. Yes, you can, but remember that the signal field will only stretch as far as the range adjustment is set on your transmitter and will be the same field width around the entire property. So if your culvert is 4 ft. below ground and your range is set at 3 ft., the signal won’t reach ground level, and you will have a big hole in your fence through which your dogs can escape.
Power Edger Method:
This common tool can quickly cut a shallow trench for your wire. Once the trench is cut you’ll make a second pass to lay the wire in the trench and cover it up. If you don’t own an edger, talk to your neighbor. If he doesn’t own one, you can rent it at your local hardware store. Edgers make quite the mess and can kick up a lot of rocks, dirt and dust. We highly recommend that you wear safety glasses while using this machine. After making a groove along the line of your planned perimeter you will have to go back around and push your dog fence cable into the slit. We recommend using one of the tools listed below to make your job easier. They are all readily available at any big box hardware store for anywhere from $2 – $10.
As always, remember to call 811 before you begin your installation. This service will come to your property and mark all underground public utilities at no charge to you. You’ll be responsible for locating and marking any private installations such as sprinkler systems or homeowner installed wiring. The lead time on getting your utilities marked is usually 3-5 days and you won’t need to be home when they come.
How much time to budget for installation using a power edger:
¼ acre: 1.5 -2hours
½ acre: 2-2.5 hours
¾ acre: 2-3 hours
Tool check list:
- Safety Glasses (these are a must)
- Ear Protection
- Respirator (recommended especially for dry, dusty soil)
- Power Edger
- Extra Fuel
- Flathead Screwdriver (keep this in your back pocket to dislodge the occasional rock from the edger blade)
- Knee Pads (you’ll spend a decent amount of time on your hands and knees when pressing the wire into the trench)
- Hammer (handy for setting ground staples if needed to get the wire to lay properly in some spots)
- Shovel
- Dog Fence Staples (available in our store)
Pro Tips:
Moist soil is preferable when using a edger. Water the area where you are planning on trenching about an hour before you start to make the job easier and less messy.
Make two or three light passes with the lawn edger. You will put less wear and tear on the machine and your back.
Mow your grass short before you install the dog fence wire. This will make it much easier to operate the lawn edger, and also make it much easier to place the wire in the trench.
Remember the wire doesn’t have to be deep. If you come across areas that are difficult to edge or dig, just use ground staples to secure the wire to the surface. A mixture of the above and below ground is fine as long as the above ground wire is not in the way of lawn mowing or foot traffic.
As you are edging make rounded corners, sharp angles will make turning the machine difficult. Sharp corners can also create cancellation of your signal field in the corner as the wires are too close together.
How To Install The Wire Using A Power Edger:
1. Making the Trench: Start the edger at the end of your neutral or twisted dog fence cable. Follow your predetermined boundary line making a shallow trench all the way around your installation path. In double loop layouts, remember to separate the trenches by 2-6 ft. depending on the size of the property and your planned signal field width. As you approach corners, tree roots, walkways, and driveways stop the machine and move it to the other side then restart the machine and proceed trenching. Refer to (Crossing Pathways for detailed instructions).
2. Placing the wire in the trench: Start at the end of your neutral or twisted wire. Tie the end of your wire spool to a stake or garden staple and begin unspooling dog fence wire, following the path of the trench you cut in the previous step. Keep the wire as close to the trench as possible to avoid having too much excess wire that will make it hard to press the wire into the trench. As you approach rounded corners and pathways unspool extra slack and secure it with ground staples to keep it from moving as you continue along.
3. Test your main loop: Before permanently securing your dog fence wire into your trench temporarily connect all your splice points and test your transmitter. Refer to (Layout & Test). Testing the fence function now (before burying the wire) will save you boatloads of time and energy later if there is an issue. Pro Tip:Don’t forget to temporarily secure your main loop to your twisted wire.
4. Permanently secure the electric dog fence wire in the trench: Starting at the end of your neutral or twisted wire, push the wire into the ground all along the trench you cut. As you push the wire into the ground cover it with soil, tamping it down as you go. Using dog fence staples when you run into areas where the wire won’t stay in the ground will help keep things neat and tidy. Pro Tip: instead of using your feet or a shovel to flatten out your trench, use a wheel barrow to follow the path of your dog fence, around the perimeter of your dog fence. It helps to put some weight in the wheel barrow, the front wheel is wide and can aid in flattening out the secured wire. A riding lawn mower will also work just as well if not better.
Hand Digging Method
The most common means of burying a dog fence wire is by hand. By hand digging we mean get a shovel or a teenager and start digging a shallow trench around the perimeter line you’ve planned. Although time-consuming and physically demanding a shovel and a strong back is the cheapest and most flexible means of burying your pet fence wire and eliminate the cost of renting a wire trenching machine. Whichever method you are planning to use, you’ll almost certainly need to hand dig some areas of your installation.
Always remember to call your local to call your local utility company before digging. Dial 811 for free utilities marking service nationwide. Your local utilities company will come to your property and make your Electric, Cable, Water and Sewage. There is no charge for this service but plan on at least a 3 day wait until all the local companies come out. Most of your major utilities are buried 12 inches or more but it’s better to be safer than sorry.
Private installations such as sprinkler systems or low voltage electricity are your responsibility to locate and mark. If you or a previous owner has installed anything underground take caution when burying your dog fence cable.
Pro Tip: Before digging, remember to run your electric dog fence lines as far back as possible from cable and electric lines. Some electrical and magnetic output by these utilities can cause dog fence interference. 10 ft. back is a good rule of thumb. If you have a smaller yard install your fence wire as far back as possible.
How much time to budget for hand digging method:
¼ acre: 2 hours
½ acre: 2-3 hours
¾ acre: 3 hours
1 acre: 4 hours
Tool check list:
- Flathead Shovel
- Axe (you may run into big rocks and/or roots)
- Flathead Screwdriver (this makes pushing the wire into your trench much easier)
- Knee Pads
- Hammer
- Dog Fence Staples
How To Install The Wire Using The Hand Digging Method
1. Digging the trench: Start digging at the end of your neutral or twisted dog fencing wire. Use your flathead shovel to make a slit 1-5″ deep around the perimeter of your predetermined layout. As you encounter roots and large rocks pull them out of your way with your axe. When crossing driveways and sidewalks stop at the edges and dig a trench a little bit deeper on both ends of the walkways. We recommend a 4-6 depth at minimum to avoid lawn edgers, lawn mowers, and snow plows from pulling and tearing your dog fence wire out of the ground. Continue your hand digging around the perimeter of property until you reach the other side of your neutral or twisted wire.
2. Placing the wire in your trench: Secure the end of the wire to a shovel or garden staple fixed to the ground at the point where your twisted wire will join the boundary wire. Walk the perimeter line unspooling wire and laying in or close to the trench you dug.Remember to leave plenty of extra slack to ease the placing of the wire in the trench in the next step. Pay special attention as you approach your corners to give yourself plenty of slack wire. It is always a good idea to secure the wire to the ground with garden staples so you are not short when it comes to placing the wire in the trench.
3. Temporally connect all your cables and test your electric dog fence: You want to know now if something isn’t right because once you move on to burying the wire you certainly won’t want to dig it up to replace a broken section of wire or correct a missed splice.
4. Securing the dog fence cable in the trench: You will have to get down on your hands and knees for this part and pair of knee pads will go a long way in making you more comfortable. Beginning at the twisted or neutral wire, push the dog fence wire into the trench with a flathead screwdriver, stick, or your fingers all the way around the perimeter. As you are pushing the wire in the trench use your other hand to close up the slit you made, covering the wire and securing it in place. Once you’ve finished inserting the wire into the slit you can go back around and tamp down the line making sure your wire is covered and held in place.
Pro Tip:
Remember the dog fence wire does not have to be buried to operate. Burying the cable protects it against trip hazards and lawn maintenance. Most visible wire will hide itself as the grass grows and the leaves fall.
Keep a good supply of garden staples on hand. Use these staples in conjunction with a hammer to push the cable into the ground and secure the wire from moving as you are working on the loop. Don’t hit the staples too hard as you may break the dog fence cable.
F.A.Q.
Q. How deep do I have to bury the wire?
A. The dog fence wire doesn’t have to be buried at all. 1-3″ is sufficient with high quality wire, just deep enough to protect the dog fence wire from creating a trip hazard or becoming entangled in your lawn mower, lawn edger or snow plow. We actually recommend not burying the dog fence wire at all when you can get away with it. Refer to our section titled Easy Installation method.
Q. How deep can I bury the dog fence wire?
A. We do not recommend burying the dog fence wire any deeper than 2 ft. Burying to such a level should only be done if you have a large enough property that you can adjust your dog fence transmitter to compensate for the depth. Remember every inch you bury the electric dog fence wire you will lose an inch of signal field.
Q. How do I bury the dog fence wire through heavy underbrush and wood areas?
A. You will have to ferret the wire through dense underbrush areas, if you want to bury it use a garden trough to dig a little trench. Usually heavy underbrush areas don’t have to be buried as they see no foot traffic and no lawn maintenance. Use dog fence staples to secure the wire to the ground every 10 ft. or so.
Q. My dogs are water dogs and we want to allow them access to the pond or lake. Can we run the dog fence wire through water?
A. Yes. Just remember that the signal field applies to depth. So if you lay your wire 6 ft. under water and set the signal field to 3 ft. the dog will be able to swim over without correction. You can use sinkers or bricks to sink the wire. Alternatively, you can float the wire using buoys to keep the dog from swimming out.
Q. Can I bury some wire and leave some exposed?
A. Yes. The performance of your electric dog fence will not be affected by a mixture of installation methods. We highly recommend only burying the dog fence in areas where it is absolutely necessary to suit your lifestyle.
Q. Can I bury the dog fence wire across a utility line?
A. Yes, but always cross a utility line with caution. Remember the dog fence wire does not need to be buried you can certainly use garden staple to secure the wire tightly to the ground across this short path.
Easy Install Method
From a functional standpoint the electric dog fence wire really doesn’t have to be buried at all. From a practical standpoint burying the wire keeps it safe from lawn mowers and other gardening tools and keeps people from tripping over it and pulling it up. It’s also less of an eyesore if it’s hidden. If done properly you can avoid both the eyesore and trip hazards without having to bury the wire. Believe it or not a non-buried fence wire holds up just as well as buried wire. There are several reasons for this. First, if you are planting or doing construction the dog fence wire is much easier to locate. It is much easier to pull the wire up and relocate it or splice it if it’s not buried. You might think that buried wire is better protected from the elements. In fact, a buried wire is exposed to the same damaging natural factors such as moisture and wild animals. In northern states where freezing and thawing are an issue contraction and expansion of the soil can lead to breakage of the dog fence wire.
Installing your pet fence wire above ground will knock hours off the installation of your dog fence and is a relatively simple task compared to burying the wire with a shovel or renting a dog fence trenching machine. We do recommend burying your twisted wire (neutral wire) that runs from your transmitter to your main loop. We also recommend installing or burying the dog fence wire across any pathways such as driveways and sidewalk crossing or areas that you expect a lot of foot traffic.
Tool & Material List:
- Stake (for holding the wire in place) a shovel or garden trough will work fine
- 6″ Garden Staples (available for purchase through our online store)
- Wire Strippers (for cutting excess wire or splicing the cable)
- Wire Ties (for securing dog fence cable to fence or structure)
How To Install The Wire Using The Easy Install Method
1. Starting at the end of the neutral or twisted cable, attach the end of your dog fence wire to a stake, shovel, garden trough or any tool that will hold the wire in place and prevent it from moving as you are spooling your wire around the perimeter of your property. Begin un-spooling the wire around your chosen perimeter bearing in mind that your final destination will be your original starting point. We recommend that you use ground staples when you round corners to keep the wire in place. We also recommend as you are spooling off wire that you temporarily staple the wire every 50-60 feet with a garden staple. This will ensure that your wire doesn’t move during the installation process. Pro Tip: Remember to always make rounded corners on your properties four corners. The corners should be rounded so as to avoid signal cancellation.
2. Continue laying your dog fence wire. As you cross driveways, pathways, sidewalks and other heavy traffic areas secure the dog fence cable to the ground leaving at least 2-4 foot of slack on both ends. You will need to come back to this area later and complete the permanent installation. Refer to the Crossing Pathways section for complete instructions.
3. As you approach physical fences secure the dog fence wire to these structures with zip ties or a staple gun. Just remember to go along the ground when you reach a gate.
4. Complete your circle back to your original starting point. Cut the dog fence wire leaving plenty of excess slack for connecting your wire to the neutral, twisted wire. Detailed instructions on how to splice your neutral cable and general spicing can be found in Splicing the Wire.
5. Grab a good supply of dog fence staples and follow your wire back around the perimeter tightly securing the wire to the ground. We recommend a staple every 10 ft or so depending upon the terrain and foot traffic. The grass will grow over the wire eventually making it invisible.
Pro Tip: Cut your lawn short before the installation. This will make the securing of the dog fence wire much easier and ensure lawn growth around the wire also protecting it from the lawnmowers blade. Make sure the wire is taut and secure to the ground.
Mounting On a Fence or Wall
Your electric dog fence wire can be mounted on any type of fencing except sheet metal. Sheet metal fencing tends to amplify the signal, which increases the distance field and results in uneven boundary lines. Simply use U-shaped wood staples and a small hammer to attach your wire to a wooden fence taking care not to apply too much pressure and risk damaging the wire. We don’t recommend the use of a staple gun for the same reason. Refer to our Dog Fence Planning section for different layout types.
Use the same method with concrete staples to attach your wire to concrete fences or walls. Depending on the style of fencing, zip-ties or twist ties may also work well. For open chain link or lattice-style fencing you can simply weave the wire through the fence and use a zip or twist tie every so often for extra security.
Mounting Height
While the ideal height for the wire is at the level of your dog’s neck, you can mount the wire at practically any height. In fact, playing with the height of the wire can allow you reduce the distance field in those sections effectively giving your dog a little more space or even the ability to walk right up to the fence. If you are mounting the wire on an existing wall or fence that already acts as a boundary you can mount the wire higher up. The higher you place the wire the smaller the distance field at the dog’s level. So if you have the distance field set at 4 feet and you mount the wire at the top of an 8 foot fence, your dog will be able to approach the fence without a correction.