


Step 1: Introduction To The Boundary
The Goal
During the first step of training your dog to comprehend an electric fence system, the goal is to teach the dog to associate the warning beep with the dog fence training flags, so that they turn and retreat whenever that warning tone is heard. During the first stop of training, there should not be any static correction. Instead, only positive reinforcement is used. The goal is to encourage the dog to turn and retreat whenever the warning tone is heard. Through teaching the dog what is expected of him or her without the correction, it allows you to add the correction in Step 2 without any confusion or stress to the dog.
The Setup
Disable The Stimulation
To begin, you will need to disable the correction on your dog fence system collar. Some systems such as the eXtreme Dog Fence® have a beep only mode that can be set on the transmitter. With other systems, you will need to use post covers to block out the correction. Refer to your dog fence manual for the fence you have purchased in order to see if this step will need to be taken care of on the transmitter, or on the collar itself.
Tip From The Pros:
In case your dog fence system does not offer a beep only mode, or no post covers came with your kit, you have the option of wrapping the contact points with black electrical tape or masking tape. This tape will work to insulate the probes, meaning it will block the shock so that your dog will only hear the tone and not receive the static correction.
Fit The Collar
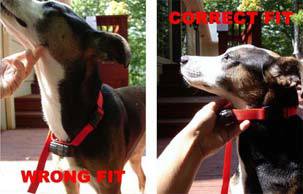
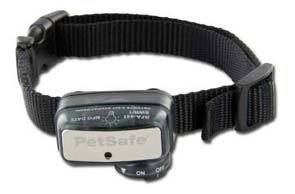
Now that you know your dog won’t be receiving the static shock, it is time to fit the collar to your dog. Your dog’s receiver collar should be worn high on his or her neck, right below the ears. The receiver box should be at the front of the dog’s neck, under his head. Your dog’s collar should be snug, without being too tight. Ideally, you should only be able to fit one finger in between the collar probes and your dog’s neck. The probes should remain in contact with your dog’s neck at all times. Should your dog have long fur, it is advisable that you use longer collar prongs (some kits will come with longer prongs, and others will require you to buy them separately.) It is also a good idea to trim the fur on your dog’s neck so that the contact points make good contact. Once the collar has been fitted properly, allow your dog to wear it for several minutes while moving around, to make sure that the collar still fits.
While it is very necessary that the collar probes make good contact with your dog’s neck, it is also important that it is not too tight. Be sure to remove the collar whenever your dog is inside and not using the fence system. Periodically, check the collar to make sure it still fits good, particularly if your dog is still growing. If the collar is too tight, or left on the dog’s neck for too long without being adjusted periodically, a rash or skin condition may occur. It is called pressure necrosis. These are essentially red sore spots on your dog’s neck. Remove the collar immediately if you see any red, sore spots. You should wash the area thoroughly, and don’t use the collar again until the sores have healed completely. Then you can refit the collar properly, and refit the collar using the guidelines above. Be sure to not leave the collar on more than 12 hours a day.
Tip From The Pros: If you are able to spin the collar freely around your dog’s neck, it is definitely too loose. It must be tighter so that the collar can function properly, and so your dog can feel the correction. If the correction can’t be felt, training your dog on the fence will not be possible.
Playtime

During each session, begin with a bit of playtime. Having a few minutes of playtime will bring the dog’s focus onto you. It will start off the session on a positive note. If you spend just a few minutes playing with your dog before you train him, the dog will be more eager to be trained and is likely to stay more interested in the process.
Tip From The Pro:
Dogs love food! People food, especially. Meat and high-protein treats are perfect because they don’t often get them. When you combine high-protein treats such as roast beef, chicken or hot dogs with playtime, the training process is likely to excite your dog and get him ready for training.
The Training
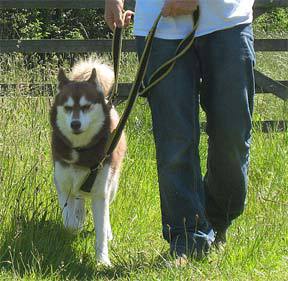
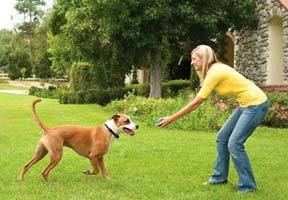
Begin by attaching a long leash to your dog’s regular collar. Don’t ever attach a leash to the dog’s receiver collar. This is because you want to avoid putting any pressure on the contact points on your dog’s neck. Allow your dog to lead you around your yard on the leash. If your dog doesn’t head straight for the flags, you can slowly walk towards the flags, stopping about a yard away. Let your dog wander closer to the line on his own. When you hear the beep, quickly tug the dog back from the flags, while saying “no” in a firm voice. You want the dog to retreat from the perimeter as quickly as possible when the warning beep is heard. After the dog has backed away into the safe zone, give him a food reward and praise. Keep in mind that this is all new to your dog. Lavish him with plenty of praise and a treat, while you are helping him or her grasp the concept of the fence. This process should be repeated at every training session. Use different areas of the yard at least 3 times a day for the first two days.
Tip From The Pro:
Take a Victory Lap to reward your dog! Begin and end each training session with what is called a victory lap. Just run around the perimeter of your yard, and your dog will follow. Just a quick skip or jump and a quick fun lap around the safe zone, away from where the training flags and dog fence wire This should be done before and after each training session. Doing this lets your dog know that he or she is safe. Although your dog may hesitate at first, just begin walking without any hesitation. Your dog is sure to follow and keep up at your pace.