


Electric Dog Fence Installation
Dog Fence Installation Overview
It is a good idea to set aside about 10 hours to get your installation completed. It should take about an hour for the 1st and 2nd steps. You will spend about 4 hours to bury the wire, if you use a trencher or edger. Crossing the driveway will take about an hour. If everything goes according to plan, making the final connection and testing the system should take one more hour. The last 3 hours are for any unexpected challenges and any breaks you want to take in this DIY dog fence job.
Installation Steps
Step 1 Installation Planning
The first thing that needs to be done is to call 811 to have your underground utility lines marked. This is important because you need to know where you need to be careful when you are digging. When you call 811, technicians will come out and mark your water, sewer, electricity, cable and gas lines for you.
To have your utilities marked, simply call 811. They will come out and mark your underground utility lines with spray paint or flags. Call early, as it may take up to a week for them to come out.
Should you have any privately-installed utilities, such as gas cylinders or a septic system, these will need to be marked as well. Since underground utilities are generally buried over a foot deep, whereas your wire is only buried a few inches down, hitting these underground utilities usually isn’t an issue.
With that being said, you need to make sure that if your dog fence wire is running parallel to any underground lines, that you separate your dog fence wire from them, by about 4 feet. However, crossing underground lines perpendicular is no problem.
If possible, also mark the location of any low-voltage power outdoor lighting lines, or sprinkler systems as well. If you don’t know where these lines are located, make an educated guess. You don’t want to damage a sprinkler line or low voltage power line. You may decide if you wish to shut off the water and the power before you begin digging, if you aren’t certain where these lines are located.
Principles of Design
Here are some things to keep in mind when you are planning how to place your wires:
Utility Lines Should Be Crossed at Right Angles
You need to make certain that you don’t run wire close to a utility line for an extended stretch. This is because in some instances, a boundary wire running close to a utility wire can cause your dog fence collar to activate where it shouldn’t.
Round Your Corners
The corner of your dog fence wire should be gradually rounded, avoiding any sharp 90 degree turns. Otherwise, the signal in that area could cancel out.
Establish Separation Between Parallel Dog Fence Wires
Each length of boundary wire emits a signal. If they are running too close together, they will cancel each other out. For this reason, any boundary wires running parallel to each other need to be separated by at least 4 feet. In addition to this, if your neighbors have an electric dog fence, you need to keep your wires separated from theirs by about 6-10 feet.
Diagramming Your Yard
On a piece of graph paper, draw a rough sketch of your property. It should show any buildings, sidewalks, driveway, gardens and underground utilities. This is so you can figure out where you would like your dog to have access to, and which parts you want him to not have access to.
Make a decision of where you are going to mount your transmitter box. Ideally, it should be located near a power outlet, and must be protected from the elements. The garage is a great place, or perhaps an outside shed that has power going to it.
Next, determine where you will lay out your dog fence wire, using the diagrams below. Your dog fence needs to make a complete loop that starts and ends in the same location. You can use twisted wire to connect your two ends of boundary wire with your transmitter. When twisted wire is used in this way, it allows your dog to cross over it without receiving a correction. For more information on twisted wire, click here.
Sample Layouts
Perimeter Dog Fence Layout
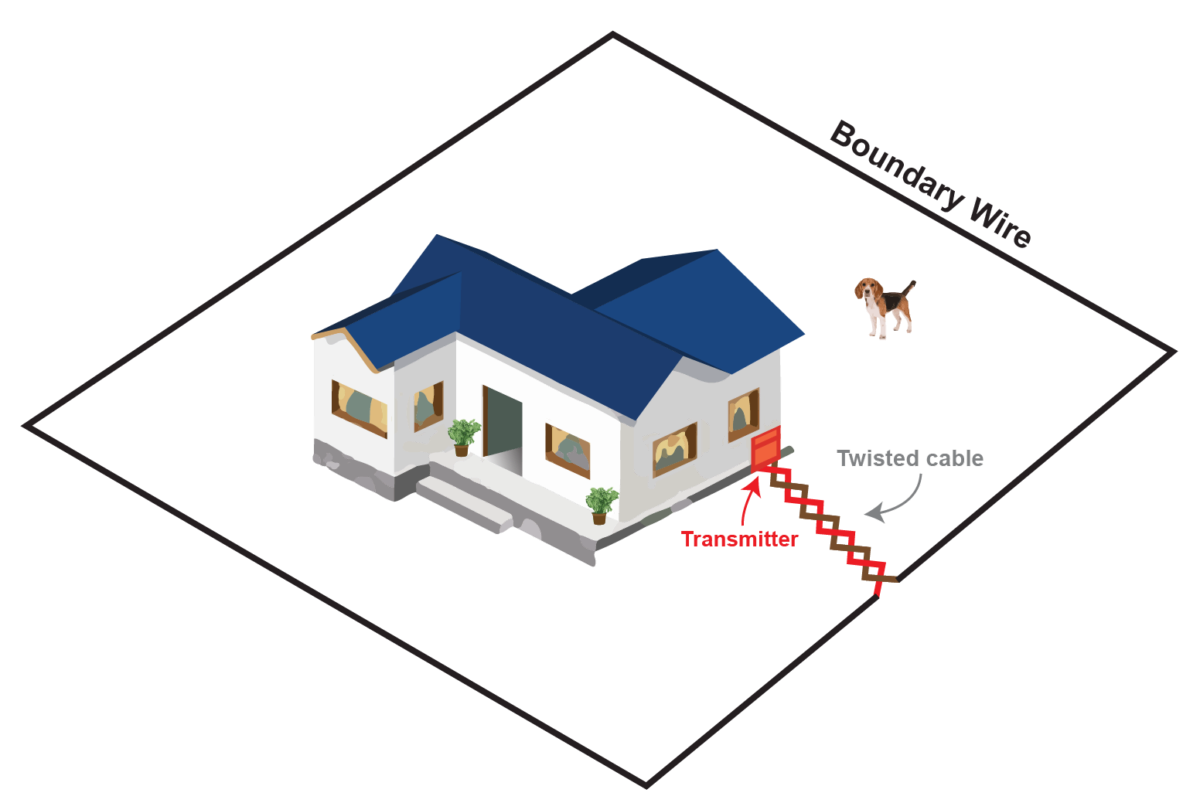
The most popular of all the layouts, the Perimeter Dog Fence Layout creates one big loop around the front and back of your home. It allows your dog access to the entire property.
Notice that you use twisted wire to connect the transmitter with the boundary loop that you have created. This allows the dog to safely walk over the twisted wire without being corrected.
Keep in mind that it is a good idea to lay the boundary wire 2 yards back from the road so that there is a safety buffer there. Also, leave at least 3 yards of separation between the house and the dog fence wire on at least one side, to let the dog pass freely between the front yard and the back yard.
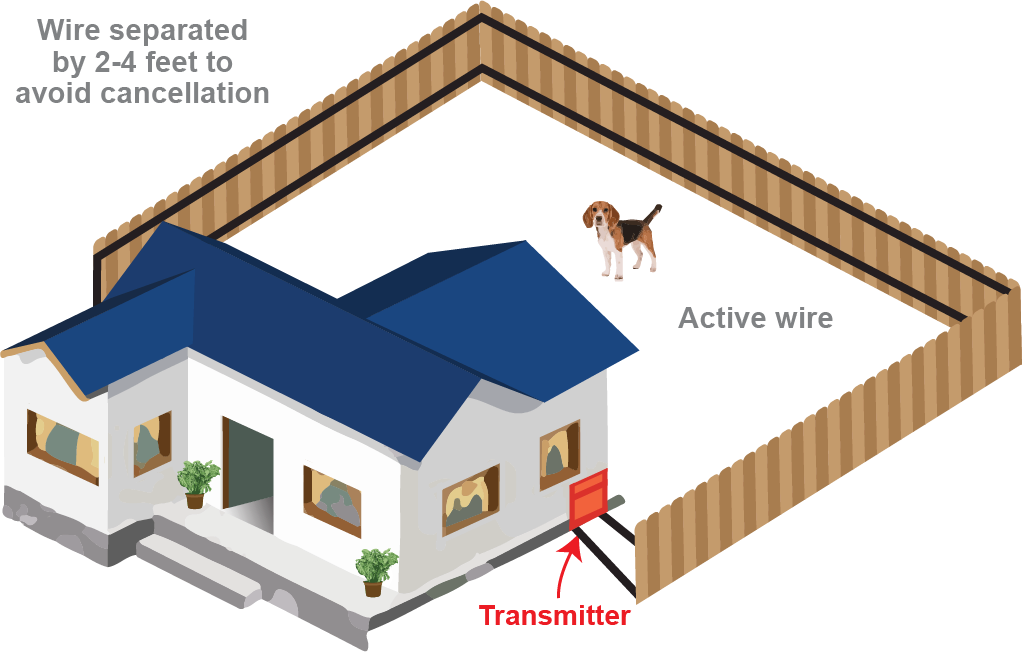
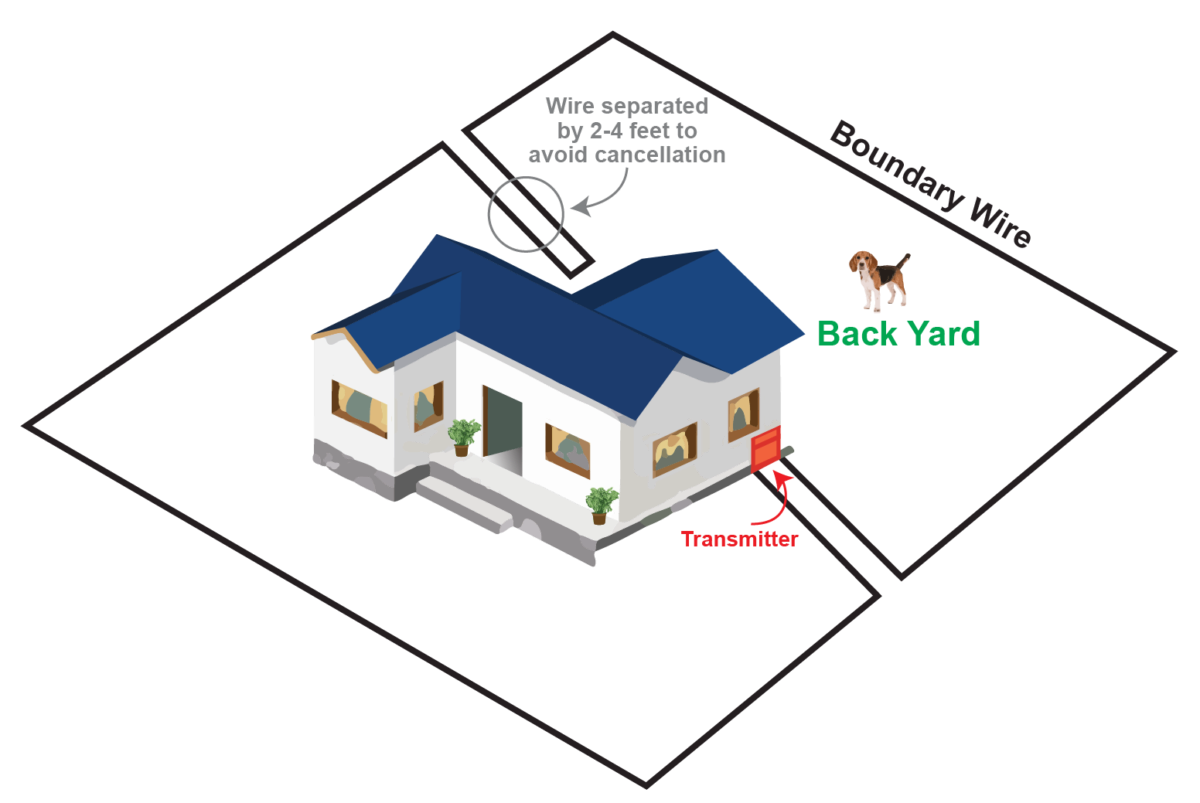
Backyard Only: The Double Loop

The challenge of enclosing your backyard only is that if you were to create a solid loop with your boundary wire around your backyard, your dog wouldn’t be able to get out the back door without being corrected. Logically, this is not what you want. What to do? The answer is a double loop. Here is how it works. You go around 3 sides of your yard, then double back on the first wire you put down, laying the wires parallel to each other. You just have to be sure to separate the parallel wires by at least 4 feet. If you don’t, you won’t get a nice strong signal along the boundary. In addition to this, you may have dead spots where there is no correction at all. Do you already have a fence in place? In this situation, you can simply begin by running your dog fence wire along the bottom of the fence, and then come back to the transmitter by running the wire along the top of the fence. However, if you have the Yardmax system in Yardmax mode, this layout will not work.
Backyard Only: The Pinch Method
Again, the challenge of a backyard only layout is that you need the house side of the boundary to be inactive, so that your dog can enter and exit your home freely. In order for the fence to work, you must have a full loop of single (NOT TWISTED) wire. The pinch method is another approach you can take.
The way to make a complete loop, while only giving your dog access to the backyard is to make a loop that goes tight around the front of the house as well. This allows you to complete the loop. However, since it is running tight around the front of the house, it doesn’t allow space for your dog to roam in the front yard.
However, when you do this kind of layout, it is important to do a quick check with the collar inside of the house to make sure that the signal isn’t inadvertently spilling into the house in rooms where the dog will be living. Should there be a problem, just decrease the boundary width, or you can just move the wire a little further away from your house.
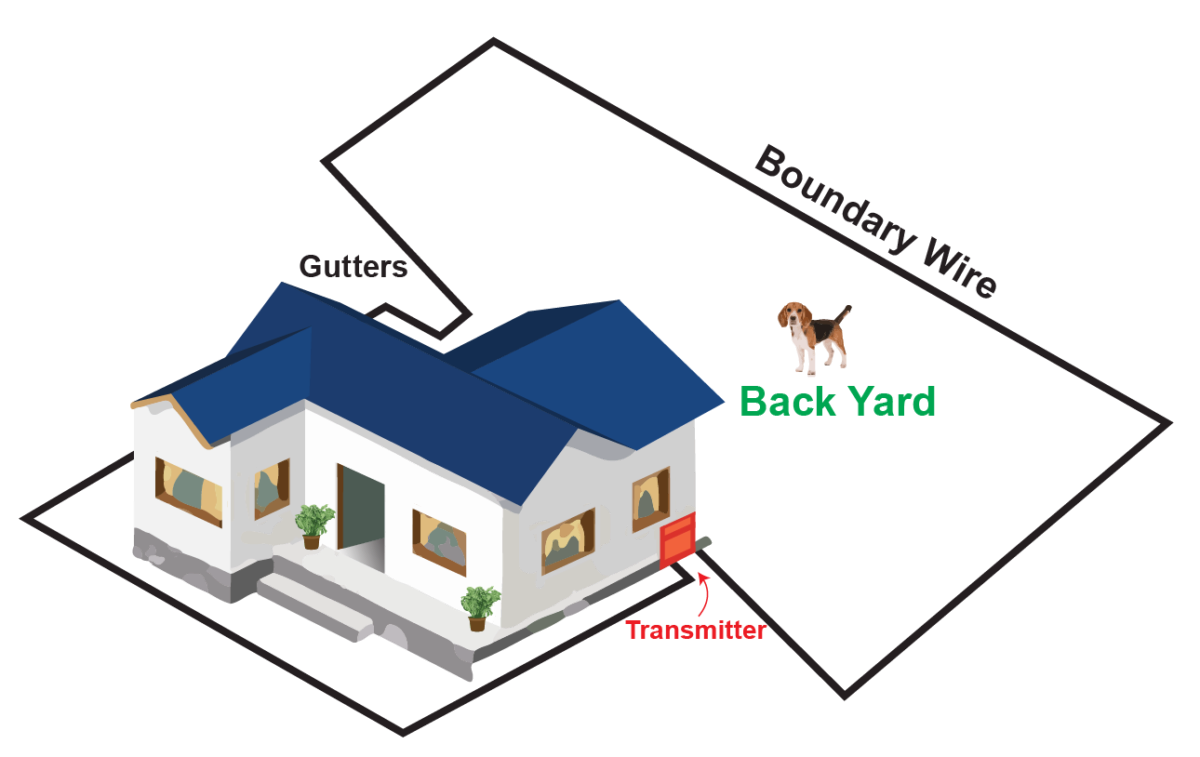
Backyard Only: Over the House Method
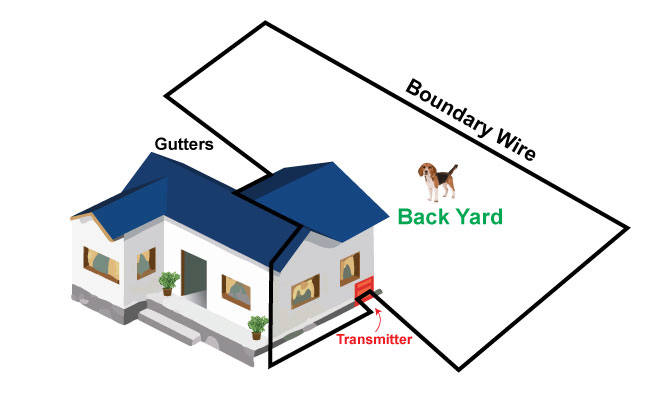
Another thing you can do if you need to contain your backyard only is to run the dog fence wire up high over the back of your house. Begin by running the wire up a downspout on one side of the house, across the gutter, and down the downspout on either side of your house. This vertical height over the ground allows enough space for your dog to get in and out of the back door without being corrected. As always, you need to check your collar to make sure that it isn’t being triggered when your dog comes in and out. Also test rooms near the line of the gutter to make certain there is no signal spilling over into those rooms. If there is, turn down the setting of the boundary width on your transmitter until it doesn’t happen anymore.
The Hourglass Layout
In some cases, dog owners want their dog to be contained in their front and back yards, but don’t want their dog to be able to cross freely in between the two. Notice that the 2 loops are connected to each other on the left hand side of this diagram, and that they both meet up at the transmitter on the right hand side. As a side note, where the wires are close to each other, creating the center of the hourglass, you need to make sure that they are at least 10 feet apart so that there won’t be interference with the signal.
One-sided Boundary Layout
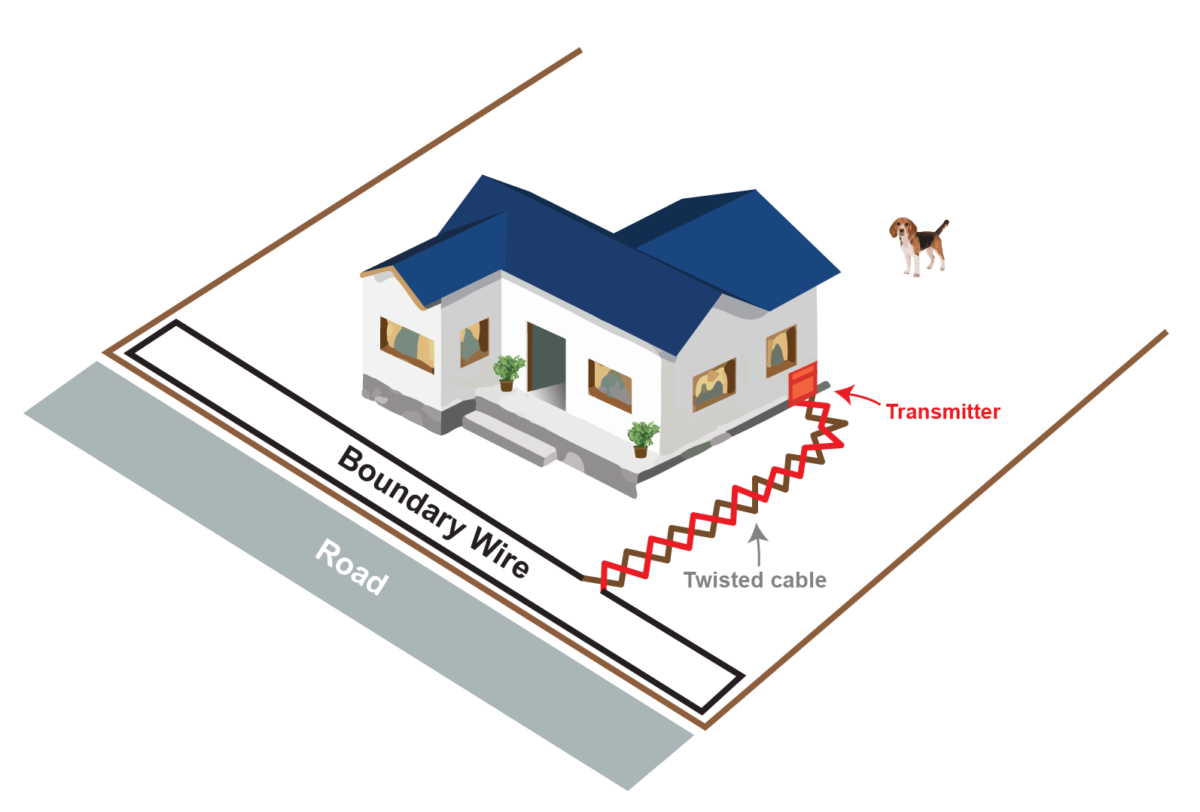
Perhaps you live in a rural setting, and all you need to do is protect your dog from going out into the road. In this case, the one-sided boundary layout is what you need. You simply run a long length of twisted wire from the transmitter, out to the road. Next, you create a long skinny loop, remembering to keep the parallel sections at least 4 feet apart so that the wires won’t interfere with each other. It is important to run your loop far enough along the road so that your dog won’t run around it. The only stipulation to this layout is that the twisted wire can only be half the length of the looped boundary wire. For example, if you have a loop that is 100 feet in a circle, you can only run 50 feet of wire back to the transmitter.
Lakefront Layouts
If you have a lakefront property, or if you would like to give your dog access to the lake, you have several different options. Please note that there is no danger that your dog will receive a correction while swimming. Your dog’s level of correction won’t change or pose any sort of safety threat. When you incorporate the lake, you need to know if your lakefront drops off, or gradually gets deeper. It depends on what you are trying to accomplish as to how you will lay the wire to incorporate the lake. When you are sinking the wire, it is recommended to run it into a water hose and sink it to the bottom of the lake. This will further protect the wire from fishing hooks and critters.
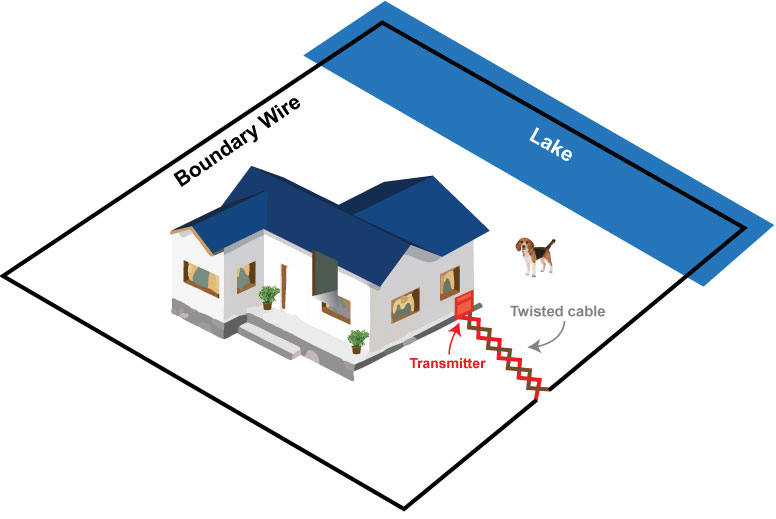
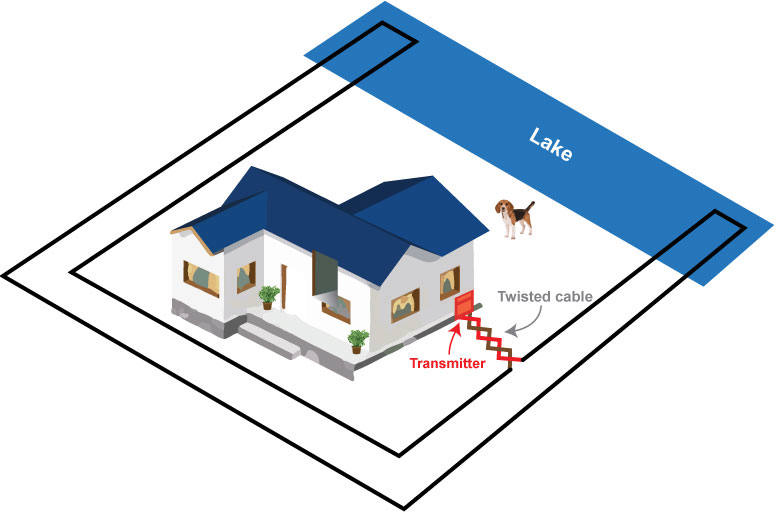
Lakefront Layout 1
Simply submerge your extra boundary wire into your lake, at the distance out that you desire. Perhaps you just want your dog to just be able to walk into the lake a few feet for a drink, or to lay down and cool off in the water. Or, perhaps you prefer sinking the wire down 10 feet so that your dog can go for a deeper swim? Depending on your goal, you can decide how much wire you need to sink.
Lakefront Layout 2
Should you have enough yard space, you can use a double loop approach to create a boundary that is three-sided. Just don’t forget to have the ends of it into the lake when doubling back so that your dog won’t be able to run around the side of the fence.
Lakefront Layout 3
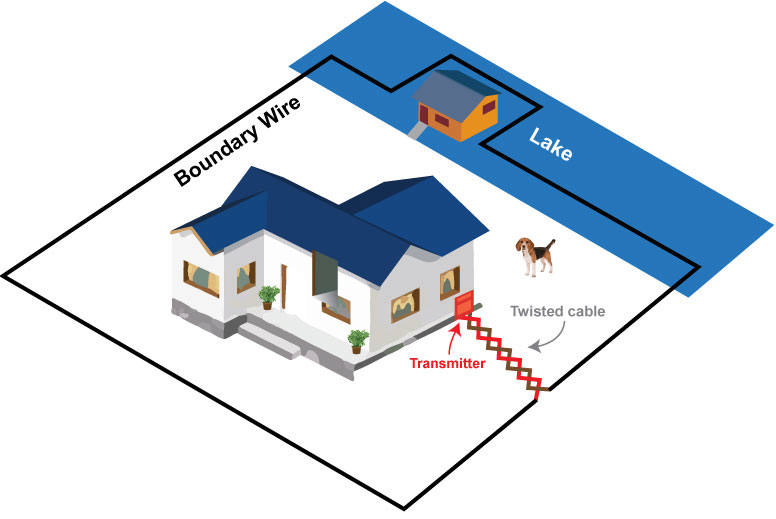
This layout is a modification of the first, just incorporating a dock and a boathouse. In this situation, the lake isn’t incorporated in the planning of the fence.
Step 2 Mounting the Transmitter Box
The transmitter is the main control for your electric dog fence. It emits a signal that is carried through your boundary wire, creating the line that your dog cannot cross. From the transmitter, you can set the width of the boundary, or how close your dog gets to the wire before the warning and correction start. The transmitter will alarm if there is a break in the dog fence wire, or if the fence is not operational for some reason.
Where to Mount the Transmitter
The transmitter needs to be:
- Next to a Power Outlet: The control box needs to be near an electric receptacle so it can easily be plugged in.
- On or Near an Exterior Wall: So the boundary wire can easily be ran outside.
- Protected From Mother Nature: The transmitter must be kept out of the elements. Particularly, it cannot get any moisture in it at all.
Interior
The transmitter should be kept in an out-of-the-way location such as the garage, outdoor shed, or inside of the cabinet of an exterior wall. After initially installing the transmitter, you won’t necessarily need to have access to it on a regular basis.
Weatherproof Box
The transmitter can also be put outside in a weatherproof box. You can find these in the electrical section of your local hardware store. Just be sure that it is large enough to house the transmitter (and surge protector if you have one.) A weatherproof box will give extra protection if you decide to put the transmitter outdoors, underneath a deck for example.
Mounting the Transmitter
The transmitter box should be screwed to the wall, using the mounting screws that are supplied. If you are mounting onto masonry or drywall, you will need to use the anchors to mount the transmitter securely. Since the transmitter is fairly lightweight, you don’t need to necessarily mount it directly to a stud.
Installing the Surge Protector
If you are in a geographic region that experiences frequent lightning strikes, it is a great idea to have your dog fence transmitter hooked up to a surge protector. Your kit may or may not come with a surge protector. If you decide that you need one, you can order one here. (link to surge protector)
The lightning surge protector is plugged directly into any grounded power outlet. If you have a surge protector you need to hook up, here is what you do:
- You have 2 ends of wire coming into your house (twisted wire). Instead of taking them directly into the transmitter, you need to put them into the surge protector, in the holes that are marked “loop.”
- Take a small piece of twisted wire to connect your surge protector to your dog fence transmitter. Insert one end of the twisted wire into the surge protector where it is marked “TX or transmitter.” The other end of the twisted wire is connected to the 2 outer screws on your transmitter, leaving the center screw untouched.
Bringing the Wire Outside
If your transmitter is mounted indoors, the wire needs to be ran outside. If there is an existing opening there, you can just use it to run the dog fence wire outside. You can also run the wire under a garage door, or through a window. Avoid running the wire through a dryer duct. This is because dryer vents get very hot, and this could cause the insulation on the wire to melt. In most cases, the easiest way to get the wire outside is to drill a hole through the drywall, pull the wire through and then put some exterior silicone caulking around the hole to ensure it is sealed properly.
Step 3 Laying Out the Wire
Before burying the wire, it is important to lay it out above ground and connect it to the transmitter box make sure that everything is working first.
Begin by laying out the sections of wire along the path that you have designed in your plan. When you lay out your wire sections, leave about 20% extra wire to allow for it to be buried. Use twisted wire to connect your boundary wire to the transmitter, and solid boundary wire to create your loop. Next, splice your wire where it is needed, such as splicing your twisted wire to your boundary loop. Bring your twisted wire into your surge protector and then into your transmitter.
Plug in your dog fence transmitter. If your transmitter is alarming and flashing, make sure that all of the sections of wire are properly joined. If this is happening, it is letting you know that the dog fence is not operational at that time. Make sure everything is hooked up correctly, and that your boundary wire forms a complete loop.
Follow the programming instructions in your manual to program your transmitter and collar. Now, when you approach the boundary wire, the collar should beep. Now that you know everything is working, you can unplug your transmitter and start burying your wire.
Step 4 Burying the Wire
There are 5 ways you can bury your dog fence wire.
Many home improvement stores and local tool shops rent wire trenchers that will dig your trench and insert your wire at the same time. It basically buries the wire for you. If you have everything ready to go, you should be able to lay wire on a fairly large property (about 1000 feet of wire) in about half of a day. As a rough estimate, you should expect it to cost around $40 including gas to rent a trencher for about half a day.
There are larger models of trenchers, which may not fit in the trunk of your car, and are also expensive. The smaller model should do just fine unless you are doing an area that covers 2 acres or more.
Various types of trenchers will work in different ways, so don’t hesitate to ask the shop helper to show you how to operate it. Be sure to always use safety glasses. When you pull the trencher, note that it is not an effortless process. With that being said, trenching is much easier than burying your boundary wire by hand. Using a wire trencher will make your life a whole lot easier.
Step 5 Driveways and Pathways
Wondering what to do if you have a driveway to go across? When you have to lay cable across a driveway, there are a few different ways you can accomplish this. You can insert the wire in an existing expansion joint, or you can cut a slot with a circular saw that has a masonry blade. You may also choose to tunnel underneath the driveway.
Inserting the wire in an expansion crack is the most common, because it is easy and the wire is hidden. If you had to lay the wire on top of the driveway, that would be more visible. Tunneling under the driveway takes a long time, unless you have a gravel driveway.
Using an Expansion Joint
If you have an expansion joint in your driveway that is conveniently located, you are very lucky. All you need to do is lay the wire in that joint, and put caulking over it to keep the wire in place.
Begin by cleaning out the joint. You need to clean out the expansion joint with a screwdriver, to remove any debris. This leaves a nice deep trench for your boundary wire to be inserted into. This will also help the caulk adhere better to the driveway. Just use a screwdriver to clean out the crack, and then a pressure hose or a broom to clear away any remaining debris.
Next, lay the wire. Put the wire into the expansion joint. If needed, you can push the wire down with the screwdriver, so that the wire rests at the bottom of the crack.
Finish by caulking. Use a waterproof caulk to seal the wire into the crack. As a side note, be aware that the temperature has to be above freezing for most caulks to set. So if it is cold, you can either wait for a warmer day, or warm the cement with a torch.
Using a Circular Saw to Cut a Slot for the Wire
If you don’t have an expansion joint in the driveway, using a circular saw is the quickest and easiest way to lay the wire across a driveway. Keep in mind that it should take about an hour for a driveway, and about a half hour for a pathway. Those who install professionally usually use this method, as you have more control over where the wire is placed.
Necessary Tools:
- A circular saw with a masonry cutting blade
- Concrete caulking
- Caulk gun
Decide on the Location for Your Cut and Mark It
Search for a seam that has already been made in the driveway or path. Cutting along this seam will give you a much neater and easier cut. If there is no seam conveniently found, mark out a line across the driveway with chalk. Following this line will help you to make a nice, neat cut.
Cut Along Your Line With a Circular Saw
Using a circular saw with a masonry blade will deliver a clean cut. You can find a cheap masonry blade for under $5. You will only need it for one small cut. If you have a tougher job, you can use a diamond tipped masonry blade which will cost you about $15. Now, make your cut with the saw. You only need to cut about ½ inch deep. When you are cutting, go slow, letting the blade do all of the work. If the cut you are making is long, be sure to take breaks so that your saw will not overheat. Be sure to always wear safety glasses when cutting, as debris will be thrown around. If you have lots of cuts to make, you may want to rent a concrete cutter from your local tool rental shop, which will cost you about $50 per day.
Lay the Wire In and Caulk Over It
Start by cleaning out the cut with a broom. Then, lay your wire into the groove that you have cut. Use a screwdriver to poke the wire to the bottom of the crack. Next, caulk over the wire with a concrete sealer. You can purchase cans of fast-drying concrete at your local home improvement retailer. You can expect it to cost about $3 per canister. Liquid Nails Concrete Repair or DAP Concrete sealer are good choices. Most caulks need a caulking gun to apply them. Those can be purchased for less than $5 at your same local store.
Go slow when you are caulking, so that the line is nice and neat. To make it look extra clean, you can use masking tape to cover the driveway on each side, and remove the tape after you have finished caulking.
Protecting the Ends of the Wire
The edge of the driveway tends to be the most common place for the dog fence wire to become broken is at the edges of the driveway where the grass meets the concrete. This is because a garden edger or weed-whacker may be used in that area. Here is what you can do to protect that segment of dog fence wire.
Bury the Wire Deeply. Where the wire crosses over into the lawn, make a deeper cut into the edge of the lawn. Doing this will allow you to bury the wire deeper and keep it from getting harmed.
Further Protect the Wire. You can insert the wire into a short length of PVC pipe. This will protect the wire from getting sliced by an edger. You can also use an old garden hose pipe, or even place a rock on top of the wire.
Simply Laying the Wire Over the Driveway
What if you just lay the wire across the driveway and leave it there? You can do this if you like, but the wire will wear out faster. You can expect to get about 1-3 years of wear before the section needs to be replaced. If you are leaving it lay across your driveway, you may choose to protect it a bit further by placing it in an old hose, or section of soft tubing. Another option would be to buy a rubber, traverse strip that fits over the wire. When the wire is laid over the driveway, remember that it can become a tripping hazard. To help remedy this, staple it tight to the ground on either side of the driveway.
Tunneling Under the Driveway
Tunneling under the driveway is more difficult, but it also looks neater. You are essentially creating a passage under the path of the driveway. This means you don’t have to put any cuts into your driveway. Tunneling under can also be helpful later if you decide to put in outdoor lighting or a sprinkler system. However, be aware that it is time consuming to tunnel under. You should expect to spend about 2 hours doing so, for an average driveway.
On a positive note, tunneling under is something that a professional installation company would be unlikely to do. As long as you are willing to put in the time, you can tunnel under without having to scar your driveway or pathway.
Tools Needed:
- PVC Pipe with ¾ inch diameter
- Hacksaw
Decide on the length of the tunnel that you need to cut out of PVC. Cut the end of the PVC at a 45 degree angle, to form a sharp point. Next, dig a hole on one side of your driveway that is about 1 foot long. Dig it a bit deeper than you want the tunnel to be.
Bore through the soil using the sharp end of the PVC pipe to create your tunnel. Do this by going only ½ of a foot at a time, then removing the PVC Pipe and emptying out the soil that collected inside of the pipe.
Another thing to keep in mind is that you need to make sure that your tunnel is not deeper than 3-4 inches from the driveway’s surface. If you put it any deeper than this, you risk running an inconsistent signal between the wire and the dog’s collar.
Step 6 Connecting and Testing
Here is the last step. Connect the wires to the surge protector (if you have one) and to your dog fence transmitter. Plug in the transmitter to power it on.
If you are getting a constant beeping from the transmitter, never fear. In most cases if the transmitter is alarming, it is because where you spliced your wire isn’t secure enough. Check everywhere that you have joined your wires together. After fixing your splices, if the transmitter is still beeping, it is time to hunt down where your wire could be broken. Read through our section on finding a break in the dog fence wire and follow those instructions.
Now it is time to program your transmitter. Here is a video on how to do that. In addition to the collar correction level, you also need to set the boundary zone on your transmitter, to register how close to your dog fence wire that you want your dog to receive the beep and correction. After this is set, it is time to place your flags.
You want to place your flags in the location of where the beep and correction is happening, as opposed to placing them on top of the wire. These flags help your dog understand exactly where the correction will happen, if he crosses where the flags are placed.
To see where the beep is happening, simply take your collar outside (but keep your hands off of the probes) and walk toward your dog fence wire. Hold the collar at the approximate height of your dog’s head. Move closer toward your boundary wire until you hear the beeping. Use your collar as your guide to set your boundary flags in the location where the beep is happening. Place one flag approximately every 10 feet. For places where you can’t plant the flags (such as on the driveway), you can just lay them down on the ground.
Congratulate yourself on a job well-done! Take a rest. Then, when you are ready, let’s get started on the most important aspect, which is training your dogs so that they understand the system.