


Dog Fence Planning Twisted Wire
What is twisted dog fence wire and how does it work?
The most misunderstood part of the electric dog fence is twisted wire. At its core, twisted wire is actually pretty simple. Twisted wire is (as the name alludes to) 2 dog fence wires twisted together. You can purchase pre-twisted wire (we recommend this) or, with a little elbow grease and some spare time, twist your own wire.
Twisted wire plays an indispensable role in the function of your electric dog fence. Twisting two wires together creates a neutral wire that does not activate the warning or correction on your dog’s collar. The twisted wire carries the signal from your transmitter box out to the main loop but remains neutral and therefore cross-able by your dog. Without the twisted wire your dog would not be able to cross the line that runs from your transmitter out to the boundary loop (see example images below). You can also use twisted wire to connect smaller loops to the main loop. Small loops can be created to keep your dog out of flower gardens, swimming pools, and just about any other no-go zone in your yard.
You cannot use twisted wire as part of the main loop. The perimeter fence wire always needs to make a closed loop or circuit. There are many different ways to achieve a closed loop. We suggest using our sample layouts as a guide to planning your dog fence installation.
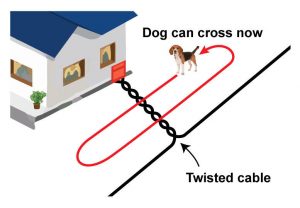
What would happen if twisted wire was not used to connect the main loop to the transmitter box for our electric fence installation? If you didn’t use twisted wire, your fence would have a “hot zone” leading from the main loop to the transmitter. The wire would be “hot” because your dog’s receiver collar would activate as it approached this area. We use twisted wire to allow your dog safe passage over this part of the fence.
How To Use Twisted Wire
As you can see in this image, the wire needs to complete a circuit or loop around your home. The origin and completion points of your fence are always the transmitter box.
If the two wires going from the transmitter box to the main boundary loop were not twisted, your dog would not be able to run all the way around the house and would instead have a horseshoe shaped ‘safe zone’.
You can twist the two wires or zip tie them together to create the neutral wire needed complete the circuit without creating a live section of wire that will activate the collar(s).
We sell pre-twisted professional and factory grade wire on our site.
Twisting short lengths of wire is relatively easy. Longer lengths are more difficult because the wire jumbles up and can create a real mess. For best results with longer lengths, consider buying pre-twisted wire.
If you are making your own twisted wire, starting at the transmitter box, run the wire from the box out to the main loop then double back to the box to make sure you have enough wire to twist (you’ll need at least twice the length that the finished twisted wire needs to be). Now, cut the wires so you have two long lengths.
Secure one end of each wire strand to a stable point, like a doorknob using a zip-tie or electrical tape (for example). Attach the free ends of wire to an electric drill and use the drill to twist your wires together. You can also hand twist but be prepared for a fight if the wire is more than a few feet long. The twisted wire is now ready to connect your transmitter box to the perimeter loop of untwisted wire.
Once you have connected the two ends of your twisted wire to the transmitter box, you’re ready to splice the other ends to the main loop wire. Use the waterproof wire splices included in your kit to connect one end of the twisted wire to each of the ends of your boundary loop.
Once your twisted wire is spliced to the main loop, check your transmitter for continuity by powering it up! Most transmitters give off an audible alarm if your loop is not continuous. Finally, test your dog’s receiver collar on the line to make sure it is also functioning properly.
Using Twisted Wire for interior Loops
This diagram demonstrates the only other way you can use twisted wire during the installation of your electric dog fence system. You can run a twisted line from your perimeter wire to an interior area within the perimeter of your dog fence. This lake loop effectively creates an exclusion zone within the main boundary, ‘fencing off’ certain areas on your property such as swimming pools, gardens, or play structures. While this is a great way to customize your system, similar solutions like wireless outdoor zone pods are much easier to install. They require no buried wire. Lake loops can be prone to damage by gardening and other maintenance. One important factor to keep in mind is the field range (signal range). Interior loops emit the same signal field as your main dog fence perimeter loop. Depending on the size of your yard and position of the loop, your dog could lose a lot of space because of the signal field width. A wireless outdoor rock exclusion zone is not prone to gardening damage and it’s field is individually adjustable so you won’t run into these issues. Wireless outdoor zones are only compatible with certain dog fence systems. See here for more information about wireless avoidance systems.